Learn how to easily set up Wix Bookings to manage services, automate scheduling, and accept client payments in this step-by-step tutorial.
Managing appointments manually is a fast way to burn out. Whether you run a beauty salon, offer fitness coaching, or provide business consulting, having a dedicated system makes a real difference. This guide walks through how Wix Bookings works in practice—from installing the app to configuring staff availability and promoting your services on your homepage.
Installing the Wix Bookings App
You can add Wix Bookings in two ways: through the Wix App Market or directly from the My Business tab in your dashboard. The My Business tab also surfaces other Wix apps like Wix Blog and Wix Chat, so it is a convenient starting point.
Search for "Wix Bookings" and click to install. Installation takes a few seconds. Once complete, the app automatically adds a Book Online page to your site menu and generates the supporting pages your booking flow needs:
- Service page — lists and describes each service
- Booking calendar page — where clients pick a date and time
- Booking form — collects client details before payment
- Cart page — shows the selected service before checkout
- Thank you page — confirms the booking and offers a Google Calendar add option
After installation, the new menu item may be pushed under a collapsed "More" menu if your navigation is tight. Drag the item up and rename it—"Services" works well—so it appears prominently. If a cart icon or login button appears against a similar background color, head to Settings and adjust the icon fill color to restore contrast.
Creating and Customizing Your Services
Wix pre-populates the dashboard with demo services such as an SEO audit, social media consultation, and legal consultation, giving you working templates to edit rather than starting from scratch. Group offerings like yoga classes or workshops are also supported, making the app flexible for both solo practitioners and class-based businesses.
To add or edit a service:
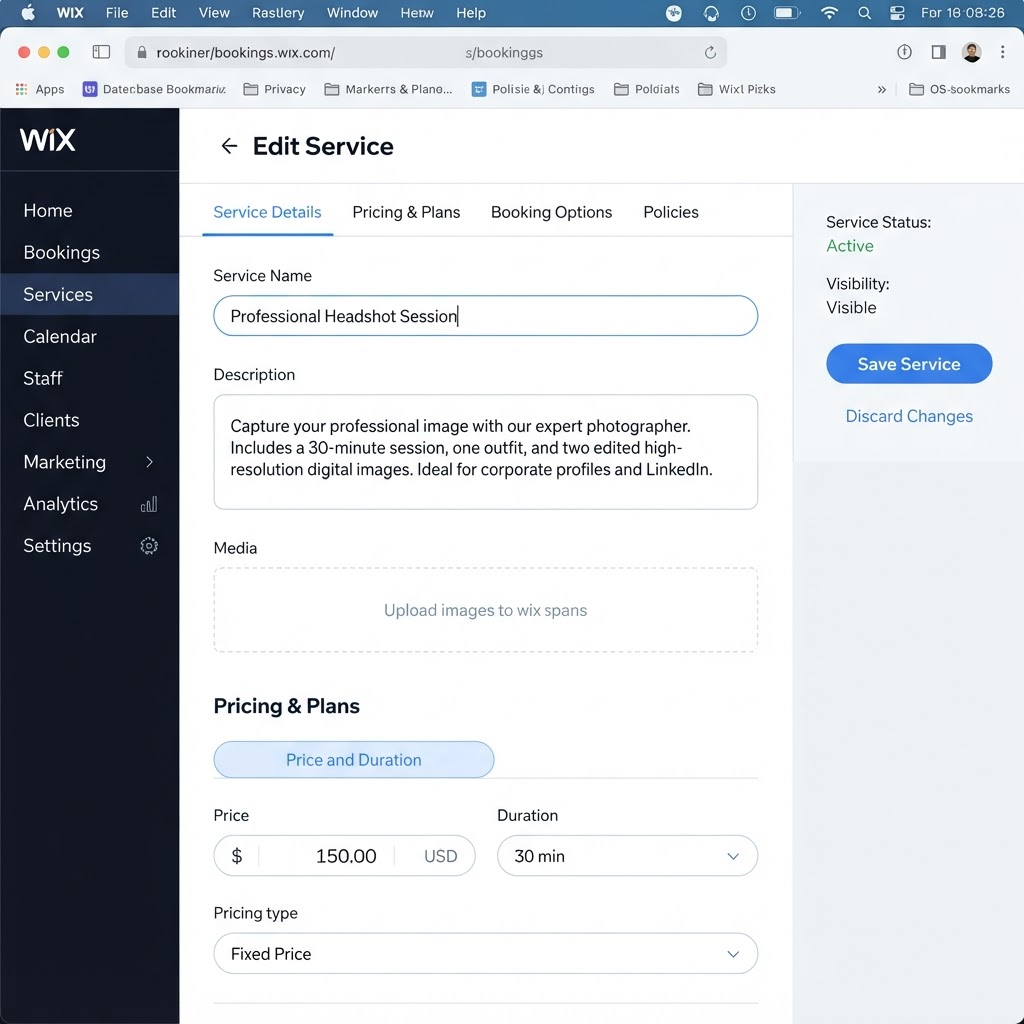
- Click Manage Services from the booking section of your dashboard.
- Select an existing template or create a new service.
- Edit the name, tagline, and description. An AI writing assistant is available inside the editor if you need help drafting copy.
- Replace the placeholder image using the built-in Unsplash integration—search a relevant keyword and select a photo directly.
- Set the session duration and a buffer time. Buffer time blocks the calendar before and after each appointment so you have time to prepare for the next client.
- Choose a pricing model: free, fixed price, or custom pricing.
- Set the location: your business address, the client's location, or a custom option such as a Zoom link sent by email after booking.
If you want to use a service as a lead magnet—offering a free short session to attract paying clients later—the free pricing option makes this straightforward. You can always switch to a paid model once your payment methods are connected in the Online Store section.
Customizing the Booking Form
The default booking form collects name, email, phone, and an optional message. You can add custom fields to gather information specific to your service. For example, if you offer SEO consulting, you might add a short-answer field asking for the client's domain name and mark it as required. Clients cannot complete the booking without filling it in, which means you arrive at every call with the context you need.
To edit the form, open the service settings and navigate to Booking Preferences → Booking Form.
SEO and Visibility Settings
Each service has its own SEO settings, so individual services can appear in Google search results. Fill in the meta title and description for any service you want to rank. You can also toggle a service's visibility on and off—useful during holidays or when a service is temporarily unavailable.
Managing Staff and Working Hours
Wix Bookings includes a built-in staff management tool, so you do not need a third-party scheduling app for team coordination. Each staff member gets their own calendar, and you can assign specific services to specific people. When a client books a service, they see only the assigned staff member's available time slots.
To configure your schedule:
- Go to the Staff section and open your profile (or create a new staff member).
- Enter name, description, email, phone, and any permission preferences.
- Set your working hours for each day of the week.
- Remove days you are unavailable entirely, or restrict hours on specific days.
For instance, if you block Monday and Tuesday entirely and set Wednesday hours to 1:00 p.m.–5:00 p.m., clients booking that service will see an empty calendar for Monday and Tuesday and only the afternoon window on Wednesday. Thursday and Friday would show your default hours unchanged. Changes take effect immediately once saved and published.
If a staff member takes a day off, they can update their own availability inside Wix directly, and clients will no longer see those slots.

Accepting Online Payments
Wix Bookings supports online payments and in-person payments. To charge clients at booking time, you need to connect a payment provider. This is done in the Online Store section of your Wix dashboard, separate from the bookings setup itself. Once connected, you can set a fixed price per service and clients will enter their credit card or PayPal details during checkout.
If payment methods are not yet configured, set the service to free temporarily and switch to paid once the store is set up. The two setups are independent, so bookings can go live while you finalize payment details.
Promoting Services on Your Homepage
A dedicated Services page in your navigation is a good baseline, but surfacing your booking option on the homepage reduces the steps a visitor needs to take. Wix makes this easy with a Booking Section you can insert anywhere on your homepage.
To add it:
- Open the homepage in the Wix Editor.
- Add a new section and browse Design Sections → Booking.
- Choose a layout. A Featured Service block works well if you have one primary offer; a column layout suits three or more services.
- Deselect "stretch to full width" if you prefer the section contained within your layout margins.
- Add a clear headline—something like "Get a Free SEO Audit"—and a short explanatory paragraph.
After publishing, visitors can click through directly from the homepage to the booking calendar without navigating to a separate page.
What the Client Experience Looks Like
Once everything is live, the client flow works as follows:
- Client visits your site and clicks Services in the menu (or a booking widget on the homepage).
- They select a service and click Book Now.
- The calendar shows only your available time slots based on your working hours.
- They choose a slot, fill in the booking form (including any custom fields), and submit.
- For paid services, they complete payment before the booking is confirmed.
- A confirmation is sent by email. The thank you page also offers a Google Calendar add link.
On your end, new bookings appear in the Booking Calendar and Booking Listings views in your Wix dashboard, giving you a clear overview of upcoming sessions.
Wix Bookings: Who Is It For?
The app is well suited for:
- Solo service providers: coaches, consultants, therapists, tutors
- Beauty and wellness businesses: salons, spas, massage therapists
- Fitness professionals: personal trainers, yoga instructors offering both private and group sessions
- Small agencies: where different staff handle different services
It is less suited for businesses that need highly complex multi-location scheduling or deeply customized booking logic beyond what the Wix dashboard exposes.
If you are weighing Wix against other platforms, the Base44 vs Wix comparison breaks down where each builder is stronger. For selling tickets to events rather than recurring appointments, How to Create an Event and Sell Tickets Online with Eventbrite covers a complementary use case.
Recommendation
Wix Bookings is a capable, well-integrated scheduling solution for service-based businesses that are already using or considering Wix as their website platform. The setup is straightforward, staff management is built in, and the client-facing flow covers the full journey from discovery to confirmation. The main constraint is that online payments require a paid Business plan, so factor that into your platform decision.
If you are starting from scratch or want to test the booking flow before committing, try Wix for free and work through the setup steps above.
● FAQ